
Btrfs Assistant + Snapper Setup Guide
Overview
Section titled “Overview”This guide sets up Parrot OS with:
- Snapper for automatic snapshots (boot + apt pre/post)
- Btrfs Assistant GUI for easy snapshot management and rollback
The Parrot installer handles partitioning and btrfs subvolume layout (
@and@home) automatically. No manual partitioning or fstab editing is required.
Part 1 — Install Packages
Section titled “Part 1 — Install Packages”sudo apt install snapper btrfs-assistantPart 2 — Create Snapper Configs
Section titled “Part 2 — Create Snapper Configs”Snapper will automatically create the .snapshots subvolume nested inside @ when the root config is created.
# Config for root — also creates the .snapshots subvolumesudo snapper -c root create-config /
# Config for homesudo snapper -c home create-config /home
Verify configs:
sudo snapper list-configsYou should see:
Config | Subvolume-------+----------root | /home | /homeNote: Do not manually create
.snapshotsor add it to fstab — snapper manages it as a nested subvolume inside@.
Part 3 — Rebuild GRUB Config
Section titled “Part 3 — Rebuild GRUB Config”After snapper creates the new subvolumes, rebuild the GRUB config:
sudo grub-mkconfig -o /boot/grub/grub.cfgOnly
grub-mkconfigis needed here — notgrub-install. The bootloader itself has not changed.
Note:
grub-btrfsis not required. It displays snapshots in the GRUB boot menu but cannot boot into them without additional initramfs configuration. Rollback is handled through Btrfs Assistant andsnapper rollbackinstead, which don’t require it.
Part 4 — Configure Snapper via Btrfs Assistant
Section titled “Part 4 — Configure Snapper via Btrfs Assistant”Open Btrfs Assistant from the application menu and go to the Snapper Settings tab.
Configure root config
Section titled “Configure root config”- Select root from the Select config dropdown
- Under Snapshot Retention, set the following values:
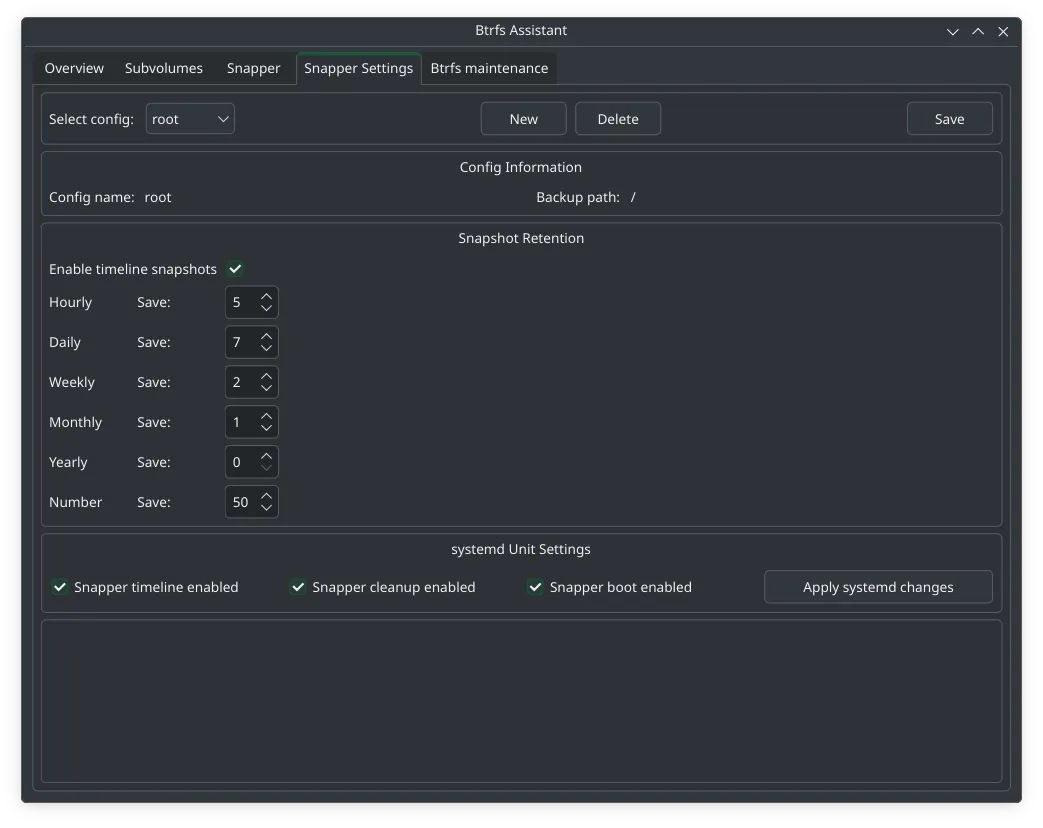
- Click Save
Configure home config
Section titled “Configure home config”- Select home from the Select config dropdown
- Under Snapshot Retention, set the following values:
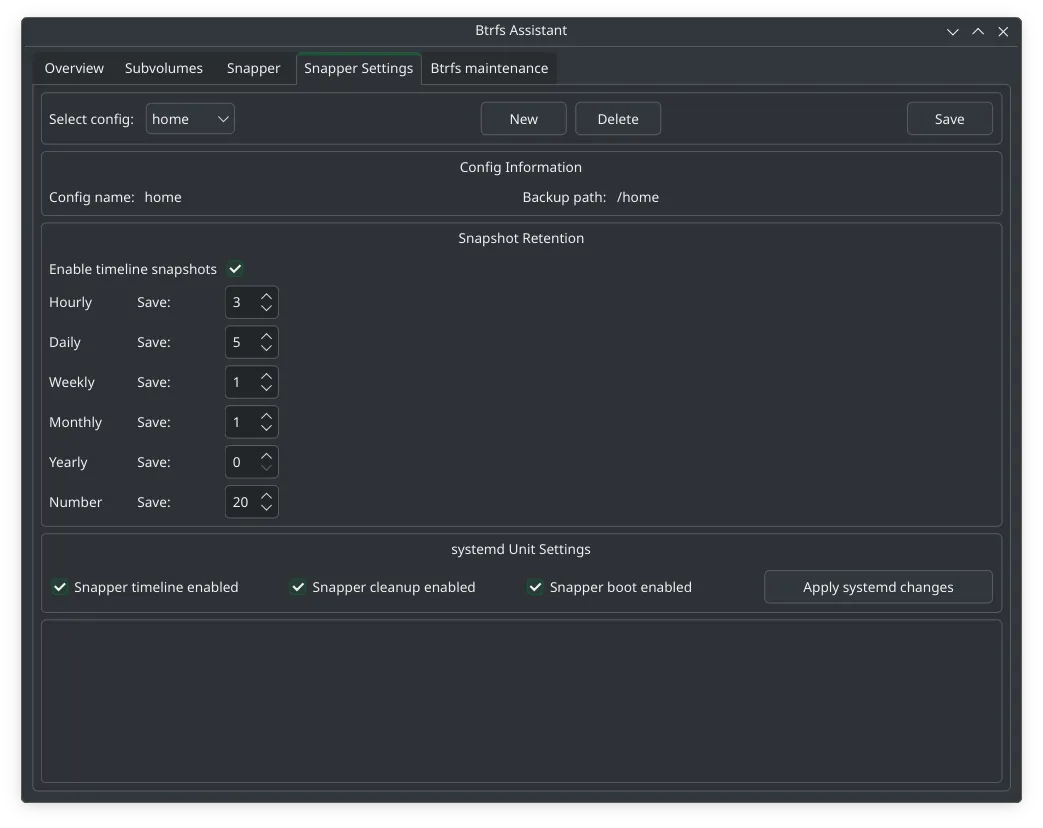
- Click Save
Enable systemd services
Section titled “Enable systemd services”At the bottom of the Snapper Settings tab under systemd Unit Settings:

This enables automatic timeline snapshots, automatic cleanup of old snapshots, and a snapshot on every boot.
Part 5 — Apt Snapshots
Section titled “Part 5 — Apt Snapshots”Snapper automatically creates pre/post snapshots around apt operations via its built-in apt hook. No additional packages are needed.
Verify the hook is in place:
ls /etc/apt/apt.conf.d/ | grep snapperYou should see 80snapper — this triggers snapper before and after every apt install, apt upgrade, and apt remove automatically.
Part 6 — Btrfs Assistant Overview
Section titled “Part 6 — Btrfs Assistant Overview”| Tab | Purpose |
|---|---|
| Overview | Disk usage and btrfs filesystem info |
| Subvolumes | View and manage all subvolumes |
| Snapper | View, create, and restore snapshots |
| Snapper Settings | Configure snapshot retention and systemd services |
| Btrfs maintenance | Run scrub, balance, and other maintenance tasks |
Part 7 — Rolling Back
Section titled “Part 7 — Rolling Back”Using Btrfs Assistant (recommended)
Section titled “Using Btrfs Assistant (recommended)”- Open Btrfs Assistant from the application menu
- Go to the Snapper tab
- Find the snapshot you want to restore
- Click Restore
- Reboot
Note: The first reboot after a restore may drop to a TTY login prompt — this is normal. Log in, then reboot once more and KDE will start correctly.
From the command line
Section titled “From the command line”# List snapshots to find the number you wantsudo snapper -c root list
# Roll back to snapshot Nsudo snapper rollback N
# Reboot into the restored snapshotsudo rebootAfter reboot, verify everything works, then reboot once more to set it as the permanent default.
From a live USB (system won’t boot)
Section titled “From a live USB (system won’t boot)”Boot a Parrot/Debian live USB, then:
# Mount the btrfs partitionsudo mount /dev/sdX2 /mnt
# Check available snapshotssudo ls /mnt/@.snapshots/
# Mount the snapshot you want as rootsudo mount -o subvol=@.snapshots/N/snapshot /dev/sdX2 /mnt/snap
# Chroot into itsudo mount --bind /dev /mnt/snap/devsudo mount --bind /proc /mnt/snap/procsudo mount --bind /sys /mnt/snap/syssudo chroot /mnt/snap
# Run rollback from inside chrootsnapper rollback Nexit
# Rebootsudo reboot
Part 8 — Cleaning Up After a Restore
Section titled “Part 8 — Cleaning Up After a Restore”When Btrfs Assistant restores a snapshot it creates a backup subvolume of your previous root, named something like:
@_backup_2026-04-15T10:22:26.644Z_testOnce you have confirmed the restore worked correctly, delete it:
sudo btrfs subvolume delete "/run/BtrfsAssistant/YOUR-UUID/@_backup_YYYY-MM-DDTHH:MM:SS.MMMZ_test"Note: Always use quotes around the subvolume name — the colons in the timestamp will cause errors without them.
Verify it is gone:
sudo btrfs subvolume list /Summary
Section titled “Summary”| Component | Purpose |
|---|---|
Btrfs @ |
Root filesystem (created by installer) |
Btrfs @home |
Home directory, protected from root rollbacks (created by installer) |
Btrfs .snapshots |
Stores all snapper snapshots (created by snapper) |
| Snapper | Automatic snapshot creation and cleanup |
| Btrfs Assistant | GUI for browsing, configuring and restoring snapshots |
snapper rollback N |
Command line rollback |
What to skip
Section titled “What to skip”- grub-btrfs — not reliable on Debian/Parrot without custom initramfs work
apt-btrfs-snapshot— redundant, snapper already handles apt snapshots via its built-in hook- Extra subvolumes (
@srv,@tmp,@usr@local,@var@log) — unnecessary on desktop